
Smart Glass Installation Guide & Precautions
Official step-by-step protocol for unpacking, positioning, wiring, and sealing CX Laminated Smart Glass panels. Follow these instructions strictly to ensure safety, optimal optical performance, and product longevity.
Required Installation Tools
Before starting, ensure the following professional tools and materials are prepared:
- Handling Tools: Heavy-duty glass suction cups (vacuum lifters) must be used for safe transport and positioning of heavy laminated glass.
- Electrical Tools: Wire strippers, soldering kit or crimp connectors, electrical insulation tape, and heat-shrink tubing.
- Dedicated CX Transformer/Rectifier: Mandatory for stepping down AC mains to the safe operating voltage.
- Premium Neutral Structural Glazing Silicone: It must strictly meet three criteria: Zero shrinkage, Neutral curing, and Zero organic solvents.
- Cleaning & Protection: Clean soft microfiber cloths, anhydrous (water-free) alcohol, and protective gloves.
I. Preparation & Unboxing
- 1. Unboxing & InspectionCarefully unpack the wooden crate. This must be performed by at least two people working together, using suction cups to handle the glass and avoid edge chipping.
- 2. Inspect Electrode WiresInspect the glass surface and electrode wires. Each panel typically has 4 wires distributed on two sides at one end (2 wires per side). Note: The two wires on the same side serve an identical function — one is a backup wire and may be left disconnected.
- 3. Frame & Bottom Support PreparationEnsure the interior of the installation frame is flat and clean. The bottom support is critical: the supporting surface beneath the glass must remain flat and provide a degree of elasticity (flexibility). Reserve a groove or opening inside the frame for routing wires smoothly.
II. Glass Positioning & Wiring
- 4. Glass Positioning & Temporary FixingUse suction cups to lift the glass steadily into the frame, placing it onto the compliant flexible bottom support. Adjust the left-right and top-bottom clearance to ensure even load distribution. Use retaining strips or temporary fasteners to stabilize the glass in place.
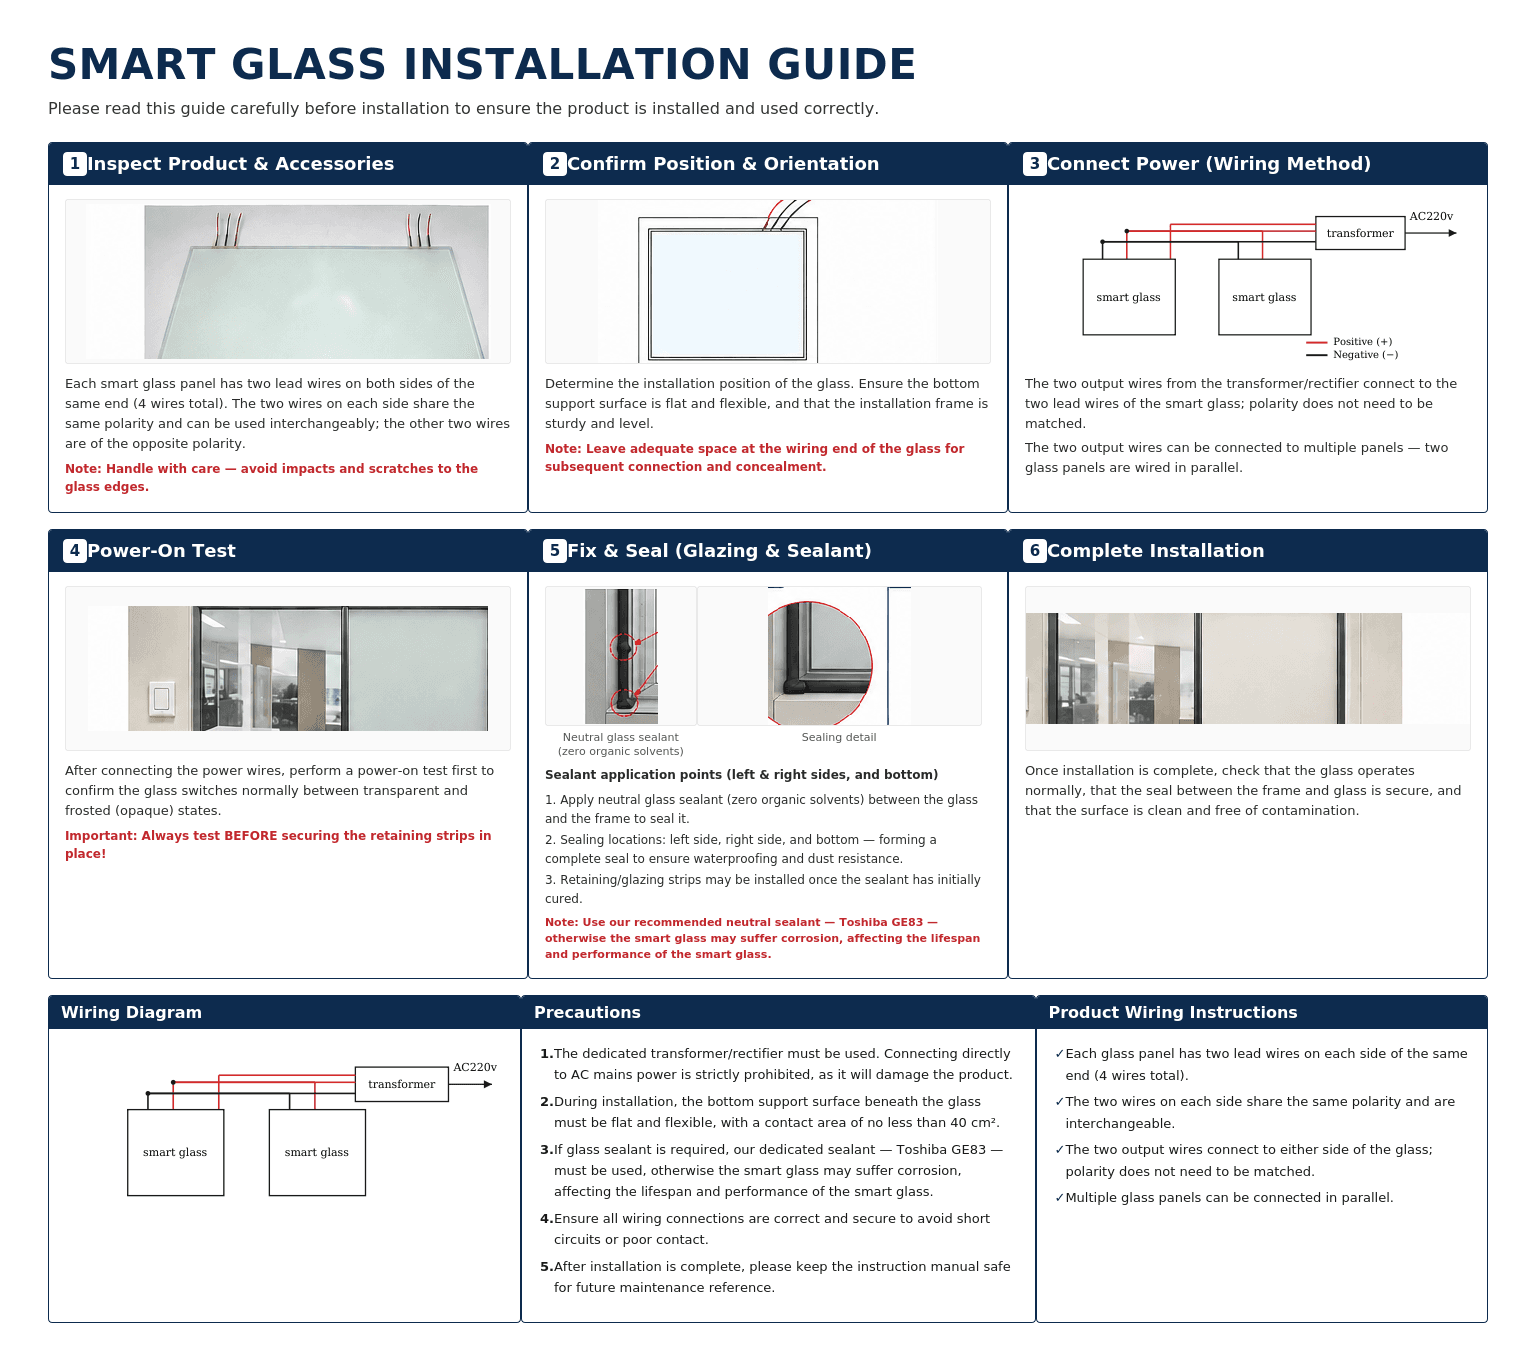
- 5. Wiring & Parallel ConnectionConnect the two output wires from the transformer/rectifier to the wires extending from the smart glass; polarity does not need to be observed. Multi-Panel Connection: If installing two or more smart glass panels, connect them to the transformer in parallel.
- 6. Deep InsulationAlways use soldering or dedicated crimp connectors to join wires, then cover with heat-shrink tubing, and wrap the outer layer tightly with insulation tape. Conceal the wiring neatly inside the wire channel—it must never be pinched or compressed by the glass.
III. Testing & Edge Sealing
- 7. Mandatory Power-On TestBefore applying sealant, you must perform a power-on test first! Connect AC power to the transformer and use the remote control or switch to operate the unit. Observe whether the glass switches smoothly between 'Transparent' and 'Opaque/Frosted' states. If everything functions normally, proceed to the final step.
- 8. Gap CleaningWipe down the perimeter gaps with anhydrous alcohol to remove any grease or debris, ensuring maximum adhesion for the silicone.
- 9. Sealing & GlazingApply the dedicated neutral sealant evenly along the gaps, ensuring the bead is full and smooth. When applying sealant, avoid the electrode wiring areas — make sure the wiring zone remains dry and retains adequate room for expansion and contraction.
IV. Critical Safety Warnings
10. Transformer Is Mandatory
We emphasize again — the dedicated transformer/rectifier must be used. Never plug the glass wiring directly into 220V/110V AC power, as this will instantly cause internal dielectric breakdown and render the glass scrap.
11. Never Compromise on Sealant
When purchasing sealant, carefully verify its properties (zero shrinkage, neutral curing, free of organic solvents). Using the wrong adhesive (like standard acidic silicone) can trigger a chemical reaction that causes corrosion to the glass, affecting its lifespan and performance.
12. Backup Wire Handling
Of the 2 wires on each side, one is a backup. Only one wire per side needs to be connected during wiring. Properly insulate and tape off any unused backup wires to prevent short circuits.
Reference: Generic Wiring Diagram
Need the offline manual?
Download the official CX Smart Glass PDF manual for your installation team.